NOTE: Promotional material such as give-aways, discounts, etc. will be periodically advertised on our Twitter and Facebook pages. Follow our pages to stay informed on potential deals!
Whether you are home brewing using extracts or all-grain recipes, quickly cooling the wort to room temperature after the boil remains one of the most critical steps in the brewing process; the wort must be brought to a temperature at which the yeast can be safely pitched into your fermentation vessel (usually between 65 and 75 degrees Fahrenheit). Cooling the wort quickly also aids in producing an effective cold break, reducing Dimethyl Sulfide (DMS) content, and largely reducing the potential for infection/contamination of your beer.
See below for more information on each topic.
There is no concern of your brew becoming infected during the boil as boiling temperatures are inhospitable to almost all common bacteria (and yeast), but during cooling the wort reaches temperatures that harmful bacteria thrive in. The only exception to this, of course, is in heavily hopped India Pale Ales (IPAs), where hops act as a robust preservative. Without the protection of heavy hopping, malt sugars in the wort are a perfect food source for multiplying bacteria, so cooling the wort quickly before sealing the wort in your primary fermentation vessel will minimize exposure time where the wort is susceptible to bacterial attack. Keeping your yeast happy is important, and having a colony of bacteria eating all the yeast’s food and drastically changing the taste profile in your beer won’t help your cause!
The cold break is a point in the chilling process where proteins in the wort that were soluble at higher temperatures precipitate out of the wort and form a “cloud” of now insoluble protein. If the wort is cooled very slowly, the proteins won’t “break” out of the wort and instead take a much longer time to precipitate (most likely in your primary fermentation vessel or even in your already-bottled beer). This will lead to a more sizable trub layer, which can then impart off-flavors into your precious beer. As such it is important to cool the wort very quickly to shock the proteins into precipitating. This allows the proteins to be filtered out along with hop particulates, resulting in a beer with better, crisp clarity and a longer shelf life.
Dimethyl Sulfide (DMS) is an organic Sulfur compound that is created in the wort when it is being heated. It is said to contribute an unwanted “cooked corn” or “cabbage” aroma to the beer (1). During the boil DMS is able to volatilize and boil off, but at temperatures between boiling and room temperature (during cooling), DMS is continually made in the wort and can no longer volatilize. Thus the slower the wort is cooled, the greater the DMS content and the more unwanted aroma present in your beer. If the wort is cooled sufficiently quickly, the window of time for DMS creation and the resultant DMS content in the wort is minimized. If you’re making a beer where aroma is important to you (EVERY BEER!), chilling your wort fast is key. That is, unless you want to replace that heavenly hop smell with cabbage.
The Z Chiller utilizes the enhanced thermal gradients of a counterflow wort chiller with the added benefit of greater surface area for heat transfer. Instead of a simple, cylindrical inner tube, the Z Chiller utilizes a unique, convoluted “spiral star” design that enables superior heat transfer out of the wort as well as unparalleled cooling uniformity for consistent cold breaks and record cooling times. The chilling ability matches or exceeds that of plate chillers without the downside of disruptive clogs. These advantages result in:
These chillers utilize a “tube-in-tube” design, with the inner tube transporting hot wort one direction, and the outer tube transporting cold water in the opposite direction. This setup maximizes thermal gradients throughout the length of the chiller for efficient and even cooling. Their efficient design leads to a greater degree of versatility when it comes to batch sizes and allows the brewer to use a wide range groundwater temperatures. In addition, a more substantial space for wort flow greatly reduces the chance of clogging compared to the plate chiller, making chilling faster and cleaning easier.
There are multiple ways to chill your wort, some more advanced and efficient than others. The wort chilling method you choose will undoubtedly affect the final characteristics and hop/malt profile of your beer. The descriptions of the main wort chilling methods as well as their pros and cons are summarized below:
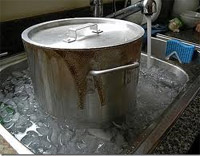
Basic ice-water bath.
(Courtesy of coldbreakbrewing.com)
The crudest method for wort chilling as well as the most inefficient. Immediately when the boil is over, the brew kettle is placed in a large ice-water bath, usually in a sink or tub. The limitations of this method are easy to imagine – the surface area between the wort, brew kettle, and ice-water is minimal, even for small home brewed wort batches. Consequentially, the wort chilling time is quite long – usually around 30 minutes or longer for a 5 gallon batch – even if the ice is continually renewed. Inevitably, this means increased chance of infection, higher DMS content, and a deficient cold break.

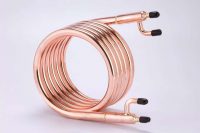
Immersion chiller.
(Courtesy of homebrewing.org)
A step up from an ice-water bath, this chiller type is a simple coil of copper tubing, which is immersed in the wort at the end of the boil. Cool water is then run through the coil, drawing heat from the wort as it passes from one end of the coil to the other. While effective in small batches, inconsistent thermal gradients cause unequal cooling throughout the wort volume, which leads to an uneven and sometimes incomplete cold break. In addition, since immersion chillers are less efficient than counterflow chillers, they require much greater total lengths. Lastly, immersion wort chillers are less versatile, so moving up in batch size ultimately means purchasing a larger chiller.
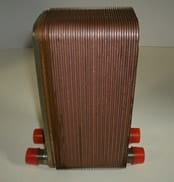
Plate chiller - between plates are
alternating compartments of
wort and cold water or coolant.
(Courtesy of homebrewing.org)
A much more efficient wort chilling method when compared to immersion chillers, plate chillers work by running wort through a series of alternating adjacent compartments created between metal plates, with cold water flowing through the intermittent compartments. This method offers greatly improved heat transfer capabilities, but in order to achieve such improvement, the plate spacing must be minimal, which often leads to unwanted clogs caused by hops or cold break proteins. These clogs cause pauses in the chilling process that can ultimately increase your chilling time and acutally hurt efficiency. Cleaning between each plate can be a painstaking process.